이번 시간에는 웹캠을 한 번 써봅시다. 원래 같으면 차선 인식 마지막에 넣었어야 했는데 어쩌다 보니 뒤로 밀렸네요. 이때까지 해왔던 것에서 입력해주는 이미지가 웹캠에서 찍는 이미지로 바뀌는 것뿐입니다. 빠르게 관련 코드부터 먼저 보겠습니다.
capture = cv2.VideoCapture(0)
capture.set(cv2.CAP_PROP_FRAME_WIDTH, 640)
capture.set(cv2.CAP_PROP_FRAME_HEIGHT, 480)

_, frame = capture.read()

capture.release()
이번에는 한 군데에 있는게 아니라 조금 퍼져있어서 필요 코드만 가져와봤습니다. 평소처럼 제일 마지막에 전체 코드를 남겨두겠습니다.
○ capture = cv2.VideoCapture(0)
웹캠을 사용하겠다는 선언입니다. 시리얼통신 전에도 몇 번 포트에서 쓸게요 하고 먼저 선언해주는 것과 같다고 보시면 되겠네요. 괄호 안에 있는 0은 사용하고자 하는 카메라의 번호를 말합니다. 일반적으로 카메라가 하나만 연결되어있다면 해당 카메라의 번호는 0번입니다. 기본적으로 캠이 붙어있는 기기의 경우 0번이 아마 원래 카메라로 되어있을 텐데 그럴 땐 숫자를 1로 바꾸시면 됩니다(웹캠을 0번으로 바꾸는 방법도 찾아보면 있을 것 같습니다만 좀 더 귀찮겠죠).
○ capture.set(cv2.CAP_PROP_FRAME_WIDTH, 640)
촬영하는 이미지의 가로 해상도입니다. 1920x1080 할 때 그 해상도 맞습니다.
○ capture.set(cv2.CAP_PROP_FRAME_HEIGHT, 480)
위와 동일하게 이미지의 세로 해상도입니다.
○ _, frame = capture.read()
원래는 ret, frame이지만 ret은 사용하지 않기 때문에 빼두겠습니다. frame에 현재 웹캠에 보이는 이미지를 저장합니다. 여기서는 반복문안에 넣어서 실시간으로 계속 이미지를 불러오도록 만들었습니다.
○ capture.release()
카메라의 사용을 종료하는 코드입니다. 특히 한 카메라를 여러 번 불러야 하는 코드에서는 절대 빠트리면 안되는 코드입니다(한 번 사용하겠다고 선언을 한 카메라는 release를 하지 않으면 재호출이 안됩니다). 카메라를 안 쓰게 될 때는 꼭 쓰는 습관을 들여놓는 게 좋겠죠.
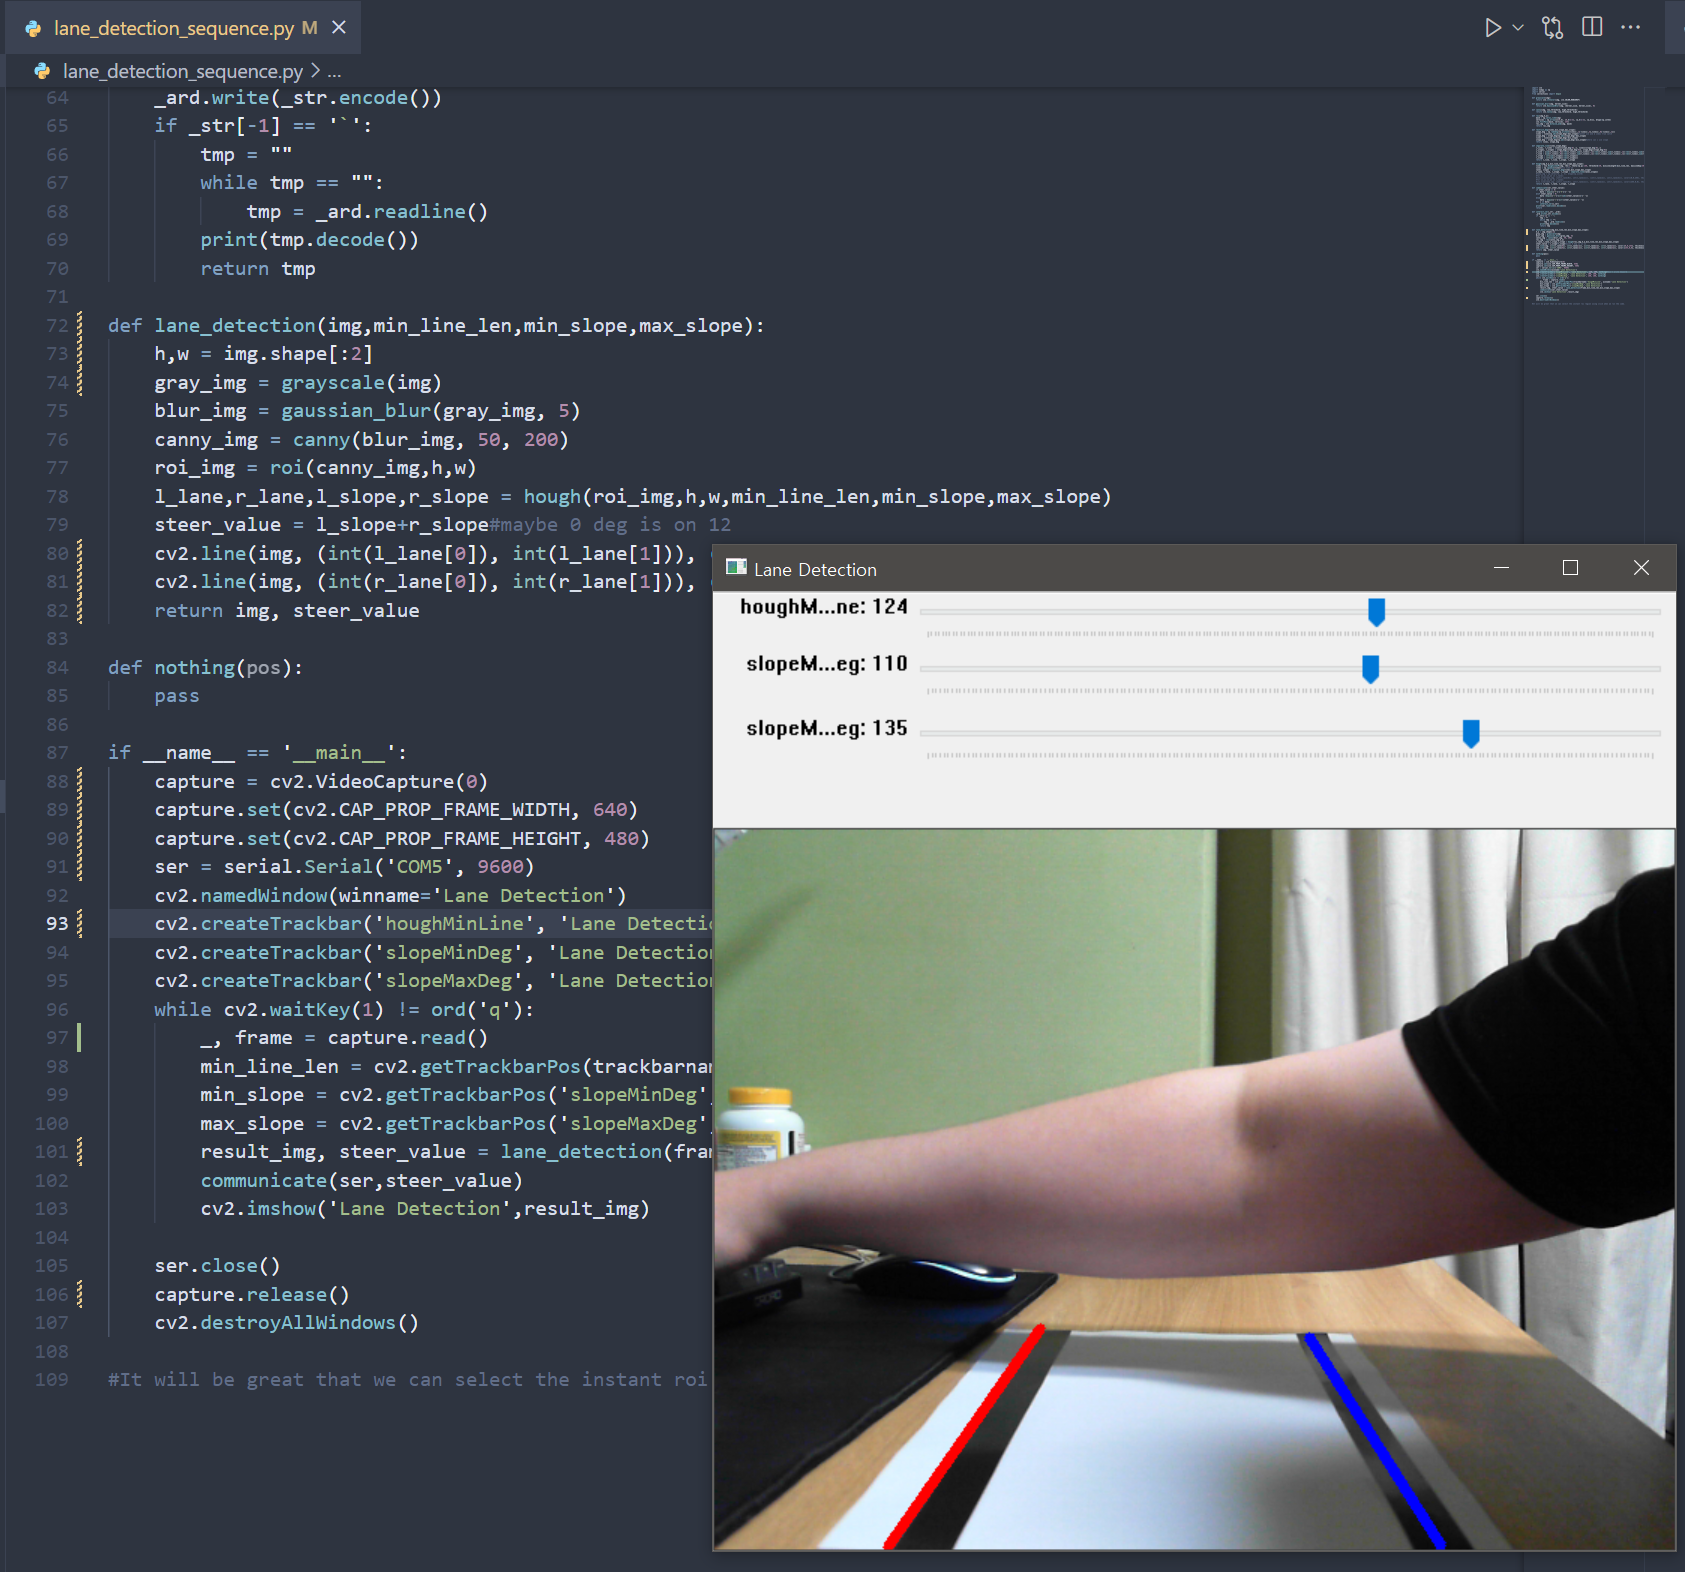
팔이 좀 나오긴 했지만 무시해주세요. 웹캠을 써도 선을 잘 잡는 걸 볼 수 있죠. 다만 이제부터는 본인의 환경에 따라서 값을 계속 조절을 해주셔야합니다. 저 같은 경우에도 현재 저 종이보다 roi가 크다 보니 검출 정확도가 많이 떨어지는 부분을 볼 수 있는데요. 이외에도 조도, 주변 환경, 그림자, 데이터 범위, 임계치 등등 정확도에 영향을 끼치는 요소가 정말 많기 때문에 카메라를 이용한 프로젝트를 하시는 분들은 정말 별 거 아니다 싶은 것에도 주의를 기울이시고 계속 모니터링을 하셔야 합니다.
import cv2
import numpy as np
import serial
from collections import deque

def grayscale(img):
    return cv2.cvtColor(img, cv2.COLOR_RGB2GRAY)

def gaussian_blur(img, kernel_size):
    return cv2.GaussianBlur(img, (kernel_size, kernel_size), 0)

def canny(img, low_threshold, high_threshold):
    return cv2.Canny(img, low_threshold, high_threshold)

def roi(img,h,w):
    mask = np.zeros_like(img)
    vertices = np.array([[(0,h), (0,h*2/3), (w,h*2/3), (w,h)]], dtype=np.int32)
    cv2.fillPoly(mask, vertices, 255)
    roi_img = cv2.bitwise_and(img, mask)
    return roi_img

def restrict_deg(lines,min_slope,max_slope):
    slope_deg = np.rad2deg(np.arctan2(lines[:,1]-lines[:,3],lines[:,0]-lines[:,2]))
    lines = lines[np.abs(slope_deg)<max_slope]#cannot use and & index true catch
    slope_deg = slope_deg[np.abs(slope_deg)<max_slope]
    lines = lines[np.abs(slope_deg)>min_slope]
    slope_deg = slope_deg[np.abs(slope_deg)>min_slope]#where can i use slope
    return lines, slope_deg

def separate_line(lines,slope_deg):
    l_lines, r_lines = lines[(slope_deg>0),:], lines[(slope_deg<0),:]
    l_slopes, r_slopes = slope_deg[(slope_deg>0)], slope_deg[(slope_deg<0)]
    l_line = [sum(l_lines[:,0])/len(l_lines),sum(l_lines[:,1])/len(l_lines),sum(l_lines[:,2])/len(l_lines),sum(l_lines[:,3])/len(l_lines)]
    r_line = [sum(r_lines[:,0])/len(r_lines),sum(r_lines[:,1])/len(r_lines),sum(r_lines[:,2])/len(r_lines),sum(r_lines[:,3])/len(r_lines)]
    l_slope = int(sum(l_slopes)/len(l_slopes))
    r_slope = int(sum(r_slopes)/len(r_slopes))
    return l_line, r_line, l_slope, r_slope

def hough(imgmin_line_len,min_slope,max_slope):
    lines = cv2.HoughLinesP(img, rho=1, theta=np.pi/180, threshold=30, minLineLength=min_line_len, maxLineGap=30)#return = [[x1,y1,x2,y2],[...],...]
    lines = np.squeeze(lines)#one time ok
    lanes, slopes = restrict_deg(lines,min_slope,max_slope)
    l_lane, r_lane, l_slope, r_slope = separate_line(lanes,slopes)
    #lane_img = np.zeros((h, w, 3), dtype=np.uint8)
    #for x1,y1,x2,y2 in l_lanes:
    #cv2.line(lane_img, (int(l_lane[0]), int(l_lane[1])), (int(l_lane[2]), int(l_lane[3])), color=[0,0,255], thickness=2)
    #for x1,y1,x2,y2 in r_lanes:
    #cv2.line(lane_img, (int(r_lane[0]), int(r_lane[1])), (int(r_lane[2]), int(r_lane[3])), color=[255,0,0], thickness=2)
    return l_lane, r_lane, l_slope, r_slope

def communicate(ser,steer_value):
    if steer_value == 0:
        data = deque(['f']+['5']+['`'])
    elif steer_value < 0:
        data =deque(['r']+[str(abs(steer_value))]+['`'])
    else:
        data = deque(['l']+[str(steer_value)]+['`'])
    for i in data:
        interact_ser(i,ser)
    print(ser.readline().decode())
    return

def interact_ser(_str, _ard):
    _ard.write(_str.encode())
    if _str[-1] == '`':
        tmp = ""
        while tmp == "":
            tmp = _ard.readline()
        print(tmp.decode())
        return tmp

def lane_detection(img,min_line_len,min_slope,max_slope,low,high):
    h,w = img.shape[:2]
    gray_img = grayscale(img)
    blur_img = gaussian_blur(gray_img, 5)
    canny_img = canny(blur_img, low, high)
    roi_img = roi(canny_img,h,w)
    l_lane,r_lane,l_slope,r_slope = hough(roi_img,min_line_len,min_slope,max_slope)
    steer_value = l_slope+r_slope#maybe 0 deg is on 12
    cv2.line(img, (int(l_lane[0]), int(l_lane[1])), (int(l_lane[2]), int(l_lane[3])), color=[0,0,255], thickness=5)
    cv2.line(img, (int(r_lane[0]), int(r_lane[1])), (int(r_lane[2]), int(r_lane[3])), color=[255,0,0], thickness=5)
    return img, steer_value

def nothing(pos):
    pass

if __name__ == '__main__':
    capture = cv2.VideoCapture(0)
    capture.set(cv2.CAP_PROP_FRAME_WIDTH, 640)
    capture.set(cv2.CAP_PROP_FRAME_HEIGHT, 480)
    ser = serial.Serial('COM5', 9600)
    cv2.namedWindow(winname='Lane Detection')
    cv2.createTrackbar('houghMinLine', 'Lane Detection', 50, 200, nothing)#don't write keyword
    cv2.createTrackbar('slopeMinDeg', 'Lane Detection', 100, 180, nothing)
    cv2.createTrackbar('slopeMaxDeg', 'Lane Detection', 160, 180, nothing)
    cv2.createTrackbar('threshold1', 'Lane Detection', 50, 1000, nothing)
    cv2.createTrackbar('threshold2', 'Lane Detection', 200, 1000, nothing)
    while cv2.waitKey(1) != ord('q'):
        _, frame = capture.read()
        min_line_len = cv2.getTrackbarPos(trackbarname='houghMinLine', winname='Lane Detection')
        min_slope = cv2.getTrackbarPos('slopeMinDeg','Lane Detection')
        max_slope = cv2.getTrackbarPos('slopeMaxDeg','Lane Detection')
        low = cv2.getTrackbarPos('threshold1','Lane Detection')
        high = cv2.getTrackbarPos('threshold2','Lane Detection')
        result_img, steer_value = lane_detection(frame,min_line_len,min_slope,max_slope,low,high)
        communicate(ser,steer_value)
        cv2.imshow('Lane Detection',result_img)

    ser.close()
    capture.release()
    cv2.destroyAllWindows()

#It will be great that we can select the instant roi region using click when we run the code.'Programming > Capstone Design' 카테고리의 다른 글
| [Capstone Design]마치며 (0) | 2022.04.19 |
|---|---|
| [Capstone Design]4. 시리얼 통신(Serial Communication) - 2 (0) | 2022.04.17 |
| [Capstone Design]4. 시리얼 통신(Serial Communication) - 1 (0) | 2022.04.17 |
| [Capstone Design]3. 차선 인식(Lane Detection) - 7 (0) | 2022.04.16 |


